
Are you struggling with capturing UTM parameters in your forms when someone navigates through multiple pages on your website?
This is a common issue when using the default UTM parameter that only captures functionality of form builders like Gravity Forms or Contact Form 7. These form builders just pull the UTM parameters from the URL when someone submits the form.
If a visitor navigates away from the initial landing page, where the UTM parameters are present in the URL, then the parameters are lost. When they eventually complete a form on your site, the UTM parameters are no longer in the URL and can’t be grabbed by your form builder.
If you can’t accurately attribute each lead to the campaign it came from, then you’re not able to understand what’s working and what isn’t. This makes it very hard to get the ROI of your marketing efforts.
Fortunately, there are solutions to these issues and in this blog post, we’ll outline them.
Why It’s Important To Pass UTM Parameters Between Pages and Capture Them With a Form Submission
If you’re not accurately capturing the UTM parameters of every lead generated from paid campaigns, then it will be hard to understand the ROI of those campaigns.
To illustrate this, let’s look at the two scenarios.
Inaccurate UTM Capture
Imagine you’ve run a Google Ads campaign and got the following results:
| Spend | $15,000 |
| Visitors | 1,000 |
| Leads | 20 |
| Customers | 10 |
| Revenue | $10,000 |
Since you’re not capturing UTMs accurately, it looks like your Google Ads campaigns are returning a negative ROI. You are spending $15,000 on Google Ads and only generating $10,000 in revenue.
This is because a large number of website visitors that came from Google Ads actually clicked around a few different pages before completing your lead capture form. This makes it impossible to attribute them to your Google Ads campaigns.
In this scenario, you’d probably end up canceling your Google Ads campaign since it looks like you’re spending more than you are making.
Accurate UTM Capture
Let’s say you are accurately tracking how many leads you get from your Google Ads campaigns. Because of this, your campaign results are looking much better:
| Spend | $15,000 |
| Visitors | 1,000 |
| Leads | 50 |
| Customers | 25 |
| Revenue | $25,000 |
Here we can see that the paid ads campaigns are actually generating a great ROI. You’re spending $15,000 per month and generating $25,000 per month in revenue.
If these were the results you were getting, you’d likely double down on Google Ads and generate a lot more leads and customers.
If you’re not able to accurately track every lead that comes from your paid ad campaigns then your ROI calculations will be incorrect, and you’ll potentially be missing out on profitable campaigns, channels, and activities that could help grow your business faster.
Get the most out of your UTM parameters!
3 Ways To Pass UTM Parameters Between Pages and Capture Them in Your Forms
To be able to track every paid ad campaign lead accurately, you’ll need to capture UTM parameters in your forms. Since the parameters are moving from page to page, capturing them is slightly different than usual.
Use Google Tag Manager
If you’re currently using Google Tag Manager on your website, it’s possible to leverage the helper function Variables to store the website visitor’s UTM parameters in a cookie in their browser. This effectively stores these UTM parameters as the visitor who browses different pages on your site.
Here’s a high-level overview of how this works:
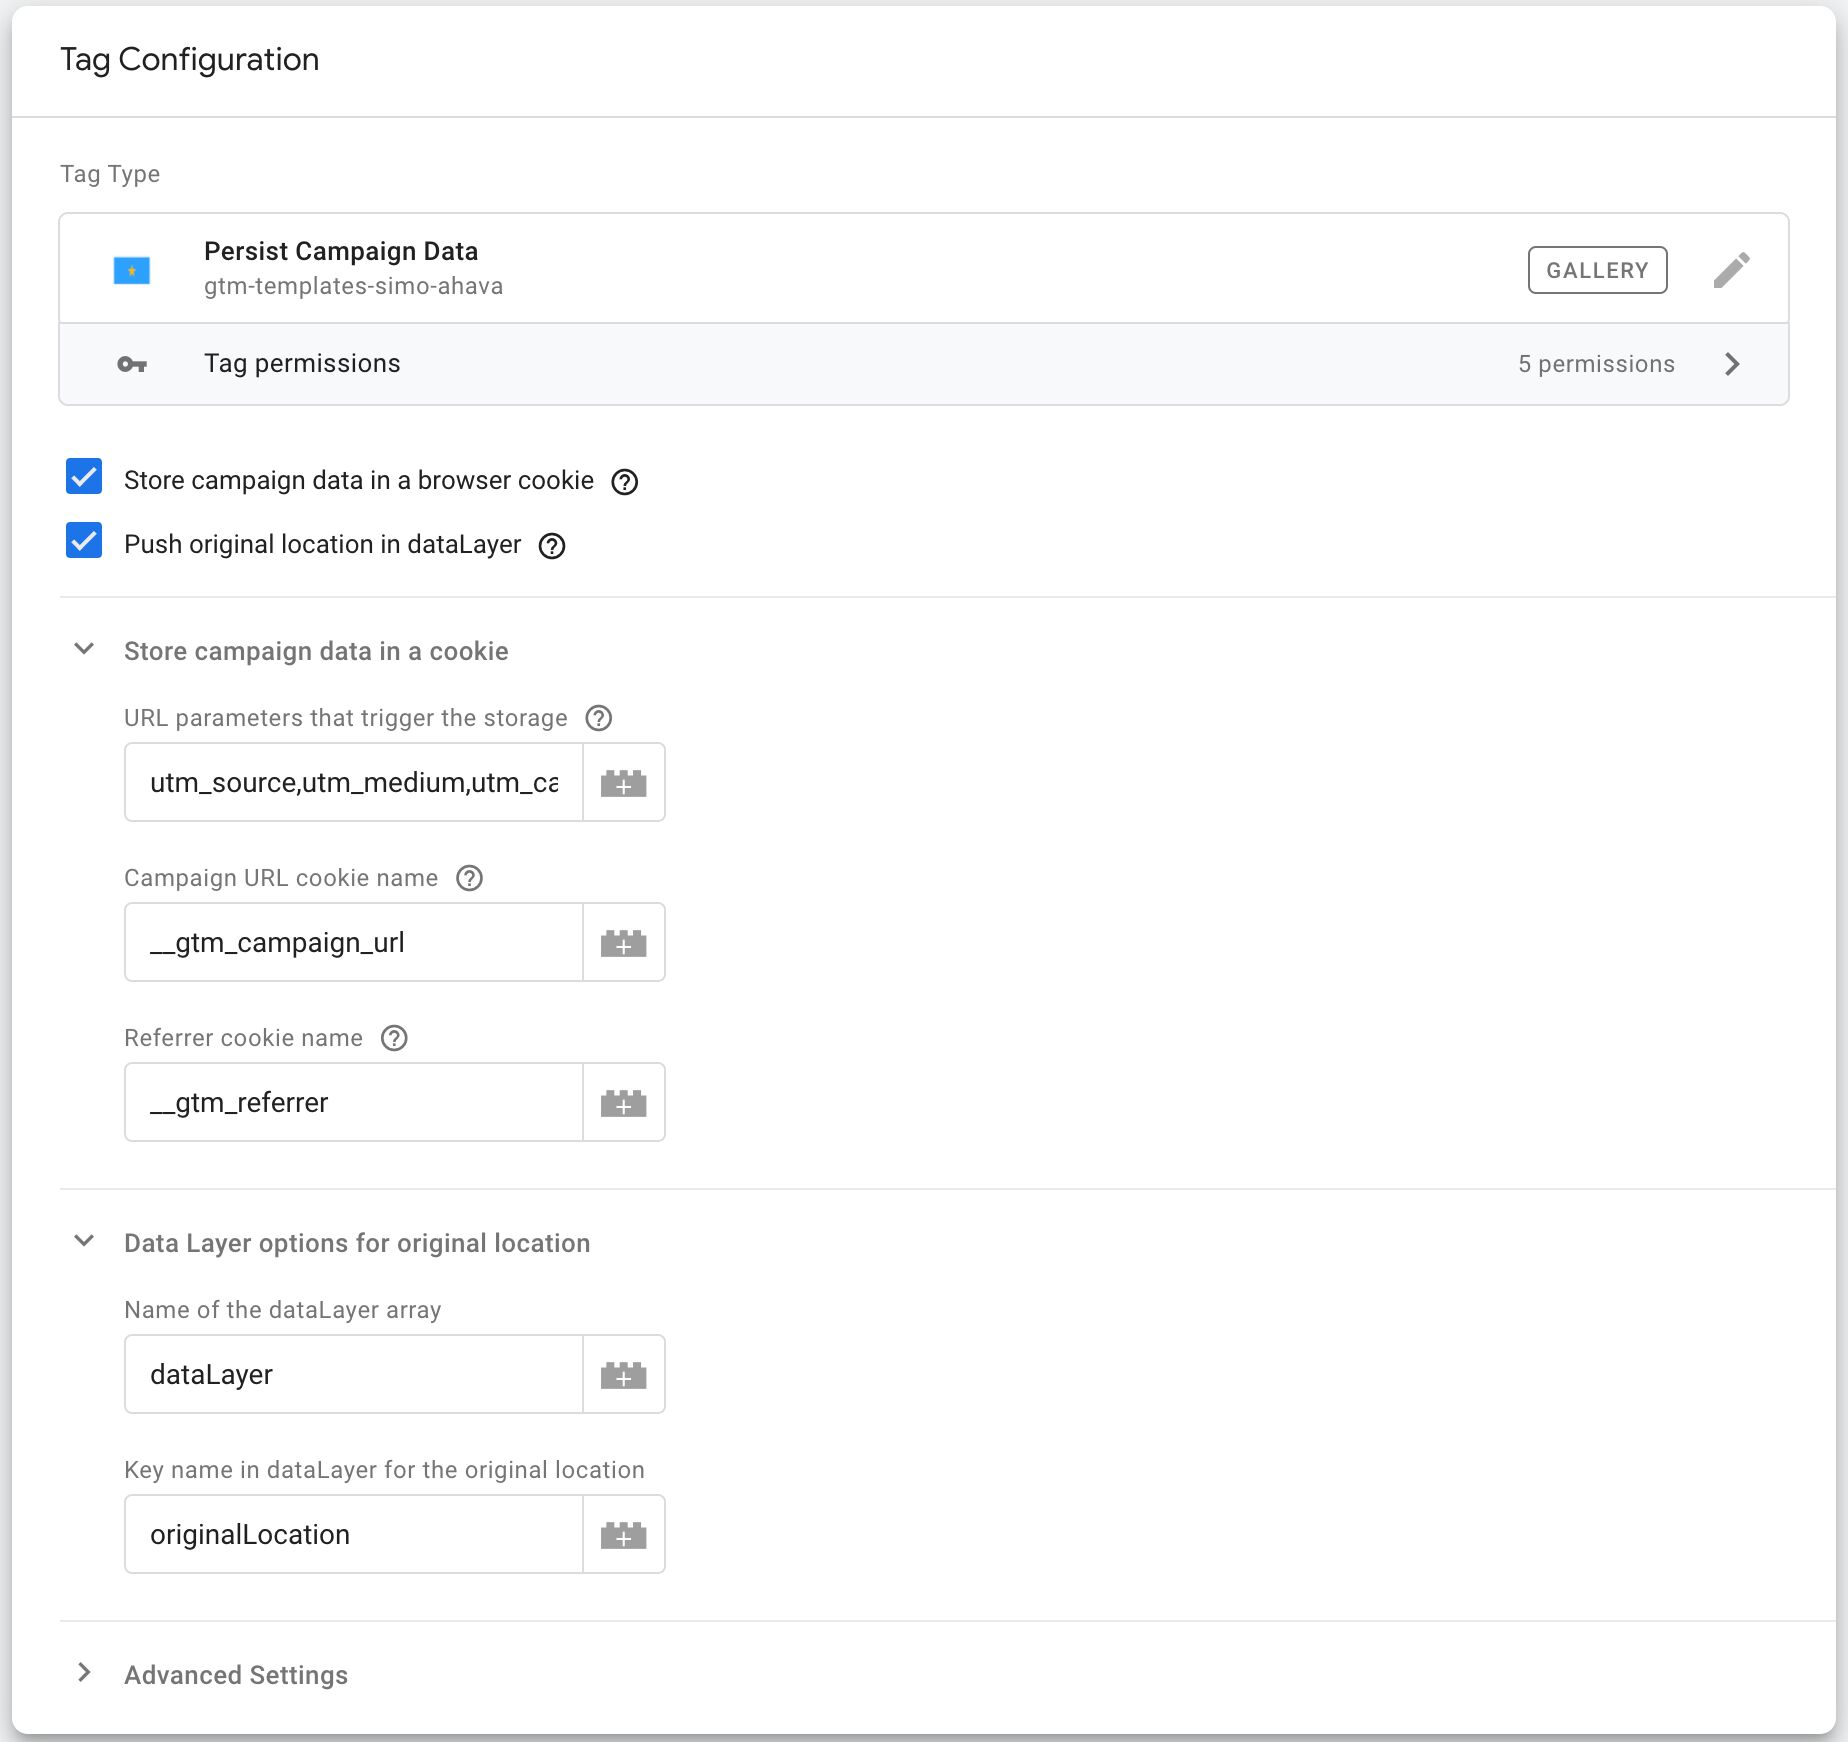
- Install the Persist Campaign Data tag template into your Google Tag Manager account and configure it to capture the UTM parameters from the URL.
- Create a cookie variable in Google Tag Manager to store the data in a cookie.
- Add some custom code to your site to grab the data from the cookie and write it into hidden fields in your form.
If this all sounds a bit difficult to you, then make sure to check out this guide that explains the process step by step and even includes the custom code you’ll need for step 3.
Pros of this approach:
- Cost — Google Tag Manager is free to use on your website.
Cons of this approach:
- Requires developers and/or marketing operations pros to set up — It requires excellent knowledge of Google Tag Manager and the ability to write code, so it’s best for those with access to technical resources.
- Only captures UTM parameters — It’s designed solely to capture UTM parameters from the URL, which means you’ll only get information on leads who come from your paid campaigns. You won’t get any attribution data on leads who come from organic channels.
Use Link Decoration
If you don’t like the idea of using GTM, consider link decoration. Link decoration refers to the idea of programmatically adding additional information to links whenever they are clicked.
Regarding passing UTM parameters between pages, here’s how the process works:
- A user lands on your site by clicking on your link with UTM parameters found in a Google Ads campaign.
- The custom code you implemented effectively copies those UTM parameters and adds them to the end of every link they click on your site. For example, if they originally land on https://utm.io/?utm_medium=cpc and then they click a link to https://utm.io/features, the code you write would actually send them to https://utm.io/features?utm_medium=cpc.
- These UTM parameters are then present on every page the user views, including the page they submit your lead form on.
- The standard UTM capturing functionality of your form tool could then pull the UTM parameters from the URL on form submission and send them to your CRM and other sales and marketing tools.
As you can imagine, this is quite technical and requires some custom code to be written. Fortunately, developers have faced this challenge in the past, and code snippets and discussions can be seen in Stack Overflow threads like this one.

Pros of this approach:
- Cost — As long as you can write code and implement it to your website, this option is free to use.
Cons of this approach:
- Requires developers to set it up — This technique requires the ability to write code so if you don’t know how to write code, you’ll probably need the help of a software engineer.
- Only captures UTM parameters — Just as GTM, this method only captures UTM parameters from the URL, limiting you to only information about leads who come from paid campaigns.
Use a Dedicated Tool
An alternative to GTM and link decoration approach is to use one of dedicated marketing attribution tools like Attributer.io. These types of tools are designed to capture the UTM parameters your visitors arrive with, store them in a cookie, and then write them into hidden fields on form submission.
Here’s a brief overview of how it works:
- You install a small bit of code on your website that monitors visitors with UTM parameters arriving there.
- It stores the UTM parameters in a cookie in the visitor’s browser.
- When they complete a lead form on your website, it writes the UTM parameters and other attribution information into hidden fields you add to your form.
Once the UTM parameters and other attribution information are captured, you can send them to your CRM and other sales and marketing tools. You can then run reports showing how many leads, customers, and revenue each channel and campaign drives.

Pros of this approach:
- Captures other attribution information — Beyond just capturing UTM parameters, these types of tools sometimes also pass through information on leads who arrive on your site through channels where UTM parameters aren’t present, including organic search, organic social, referral, and direct.
- Cleans the data — Attributer was built to expect inconsistencies in UTM usage, like using utm_source=google in some campaigns and utm_source=google-ads in others and can assign leads to the correct channel regardless.
- Captures landing page data as well — On top of capturing UTM parameters, these types of tools also captures the landing page URL, such as web.utm.io/blog/utm-naming-conventions-guide/, and landing page group, such as /blog, which allows you to run reports that show how many leads and customers are different pieces of content on your site are generating.
Cons of this approach:
- Cost — If you don’t already have a tool like this in your tech stack, adding it is going to increase your marketing spend.
Your Turn
Now that you understand the different options for passing UTM parameters between pages, it’s over to choose the one solution you think fits the best with your setup.
Before choosing one solution, ensure you have proper UTM conventions set up across all your ads and campaigns. With a UTM builder and management tool like UTM.io, it’s super straightforward to establish your company’s UTM conventions and ensure your teammates are using them correctly.