
Custom UTM parameters in GA4 let you track campaign data beyond the five standard fields. This guide shows you how to create custom UTM parameters, set them up as custom dimensions in GA4, and report on them using Google Tag Manager.
What Are Custom UTM Parameters?
Custom URL parameters are little bits of info added to the end of your campaign links. They work like tags that tell you details about the link—like where the traffic comes from, how people found it, the campaign name, and other things you choose. These parameters are critical for tracking how well your marketing works in detail.
For example, a URL with custom parameters might look like this:
https://example.com?utm_source=facebook&utm_medium=social&utm_campaign=summer_sale&utm_content=ad_variant1&product=shoes&color=red
In this URL:
- utm_source: Identifies WHERE the users are coming from (e.g., Facebook).
- utm_medium: Specifies HOW the users are coming to your website (e.g., social).
- utm_campaign: Tells you more about WHY or the campaign (e.g., summer_sale).
- utm_content: Helps you tell the difference between different ad content or creatives (like “ad_variant1”).
- Custom URL Parameters
- product and color: Special tags just for this campaign. They let you look deeper into what users like.
Using these parameters, you can collect detailed information about where your visitors come from and how they interact with your campaigns.
Build custom UTM parameters with ease.
Why Use Custom UTM Parameters in GA4?
1. See more detail
Custom URL parameters let you learn more than just basic numbers. They help you find out what your users like, how they move around your site, and which ads catch their eye.
Real-world example: Suppose you have an online pet store. You run two ads: one for special dog treats and another for eco-friendly cat toys.
By using custom URL parameters, you discover that the cat toys are getting twice as many clicks. Now you know to focus your marketing on cat toys to sell more.
2. Know What’s Really Working
Finding out exactly where your visitors come and which ads or campaigns are bringing in customers.
Real-world example: Let’s say you’re promoting a new app with emails and social media ads. Custom parameters show that 80% of your downloads come from emails.
With this knowledge, you can spend more on email marketing and improve your social media ads.
3. Improve Your Campaigns
Custom parameters give you information to decide who to target, what messages work best, and where to spend your money.
Real-world example: A fitness company notices that ads about “home workouts” do better than those about “gym equipment.”
With this info, they focus on home workouts, leading to more interest and sales.
4. Keep Your Data the Same Everywhere
When data isn’t consistent, it’s like reading a book with missing pages—it doesn’t make sense. Custom URL parameters make sure your tracking is the same across all platforms, so your reports are accurate and easy to understand.
Real-world example: A big fashion retailer uses tools like UTM.io, Google Tag Manager, and Google Analytics 4 along with custom parameters.
This way, their marketing team can easily compare how campaigns are doing in different countries and platforms without getting confused.
5. Make the Experience Personal
People like feeling special. Custom parameters let you adjust content to match what users enjoy, making them more interested and more likely to buy.
Real-world example: An online bookstore uses custom parameters to see if a visitor clicked on an ad for mystery books or science fiction.
When the visitor arrives, they see recommendations in their favorite genre, making them more likely to purchase a book.
So next time you’re setting up a campaign, remember: those extra bits at the end of your URL could make the difference between guessing in the dark and hitting the target.
Tools You Need: UTM.io, GTM, and GA4
Before we start, let’s look at some tools you’ll need:
1. UTM.io
Simplifies creating and managing UTM codes for your campaign links. The plaform keeps everything organized and helps prevent mistakes in your tracking URLs. Try it free now.
2. Google Tag Manager (GTM)
GTM lets you add and update tracking codes on your website or app without changing the actual code.
3. Google Analytics 4 (GA4)
GA4 replaced Universal Analytics. It helps you track what people do on your site or app, offering advanced features to see how users interact across different devices and platforms.
These tools work together to help you understand your marketing campaigns better. With them, you’ll see where your visitors come from, what they do on your site, and how to make your campaigns even more successful.
How to Track Custom Parameters
Follow these general steps:
Step 1: Set Up Parameters with UTM.io
- Objective: Create campaign URLs with standard and custom parameters.
- Use UTM.io to generate URLs so all parameters are correctly formatted and consistent.
- Save frequently used parameters and templates for future use to save time and drive consistency
Step 2: Capture Parameters with GTM
- Objective: Extract custom parameters from URLs using GTM.
- Configure variables in GTM to capture each custom parameter.
- Set up custom tracking to pass these parameters to GA4 or other analytics tools.
Step 3: Configure GA4
- Objective: Set up custom dimensions to track the parameters as user properties or event parameters.
- In GA4, define custom dimensions that correspond to your custom parameters.
- Based on your tracking needs, ensure that these dimensions are set at the correct scope (user).
Step 4: Verify Tracking
- Objective: Use GA4’s DebugView and GTM’s Preview Mode to confirm that parameters are captured and passed correctly.
- Test the entire flow by clicking on a tagged URL and verifying that the data appears in GA4.
Step 5: Analyze Reports
- Objective: Use GA4’s reporting capabilities to analyze the data collected through custom parameters.
- Customize reports by adding your custom dimensions.
- Use insights from the data to refine your marketing strategies.
Detailed Example: Tracking a Travel Campaign
Let’s apply these steps to a real-world scenario: a travel campaign promoting various types of trips to different destinations.
Scenario:
You are running a marketing campaign for a travel agency that offers different types of trips to various destinations. You want to track:

Trip Type: Honeymoon, business, adventure, family.
Destination: Paris, London, New York, Tokyo.
Step 1: Set Up Parameters with UTM.io
Objective: Create URLs with both standard UTM parameters and custom parameters for tracking.
- Open UTM.io: Sign in or create an account if you haven’t already.
- Create a New Campaign URL:
- Website URL: https://example-travelagency.com
- UTM Source: facebook
- UTM Medium: social
- UTM Campaign: spring_getaways
- UTM Content (optional): ad_version_a
- Add Custom Parameters:
- trip_type: business-trip
- destination: london
- Save Parameters: Use UTM.io’s features to save this set of parameters for future campaigns.
- Generate the URL: The resulting URL should look something like:
https://utm-office-hour.weebly.com/?utm_campaign=spring_getaways&utm_medium=social&utm_source=facebook&utm_content=ad_version_a&trip_type=business-trip&destination=london

Step 2: Capture Parameters with GTM
Objective: Configure GTM to extract custom parameters from the URL and send them to GA4.
1. Create URL Variables in GTM for each custom parameter:
- Go to Variables > New > Variable Configuration > URL.
- Variable Name: URL – Query – trip_type
- Component Type: Query
- Query Key: trip_type
- Repeat for destination.
- Variable Name: URL – Query – trip_type

2. Add or update the Google Tag: Event Settings Variable
- Go to Variables > New > Variable Configuration > Google Tag: Event Settings Variable.
- Variable Name: Google Tag – Event Settings Variable
- Expand the Google Analytics User Properties section
- Add each property line by line:
- Property Name: trip_type
- Value: {{URL – Query – trip_type}}
- Property Name: destination
- Value: {{URL – Query – destination}}
- Property Name: trip_type
- Add each property line by line:

3. Set Up GA4 Configuration Tag:
- Go to Tags > New > GA4 Configuration.
- Measurement ID: Your GA4 property ID.
- Expand the “Shared event settings” section:
- Choose the {{Google Tag – Event Settings Variable}} created or updated in the previous step
- Trigger: Set the tag to fire on all pages or specific pages where tracking is needed.

4. Debug in Preview Mode and Submit
- Use GTM’s Preview Mode to ensure variables are capturing the correct values.
- Use the URL you created using UTM.io as “Your website’s URL”
- Once confirmed, submit the changes in GTM

Step 3: Configure GA4
Objective: Define custom dimensions in GA4 to make the parameters available in reports.
- Access GA4 Admin Panel:
- Go to Admin > Custom Definitions > Create Custom Dimensions.
- Create Custom Dimensions:
- Name: Trip Type
- Scope: User
- Event Parameter: trip_type
- Name: Destination
- Scope: User
- Event Parameter: destination
- Name: Trip Type
- Save the custom dimensions.
While event-scoped dimensions capture data for individual interactions, they lack continuity across sessions or the user’s journey, making them unsuitable for attribution.
Attribution requires a user-centric approach that spans multiple interactions and sessions. Capturing campaign parameters as user-scoped dimensions ensures that this data persists throughout the user’s journey, enabling accurate and comprehensive insights.
While GA4 has a limit of 25 user-scoped custom dimensions per property, prioritizing these for critical attribution data is essential to maintain consistency and relevance in your reports.

Step 4: Verify Tracking
Objective: Confirm that GTM and GA4 are correctly capturing the parameters.
- Open GA4 DebugView:
- Navigate to Configure > DebugView.
- Trigger the Event:
- Visit the tagged URL in your browser with debug mode enabled (use the ?debug_mode=true query parameter or the Google Analytics Debugger extension).
- Check for Parameters:
- In DebugView, locate the events and expand them to see if trip_type and destination are appearing with the correct values.
Step 5: Analyze Reports
Objective: Utilize GA4’s reporting features to analyze the data collected from the campaign.
- Create an Exploration Report:
- Go to Explore > Blank (or use a template).
- Set Up the Report:
- Variables:
- Dimensions: Add Trip Type, Destination, Event Name.
- Metrics: Add Event Count, Conversions.
- Tab Settings:
- Rows: Trip Type, Destination.
- Columns: Event Name.
- Values: Event Count.
- Variables:
- Analyze Data:
- Identify which trip types and destinations are generating the most engagement.
- Use the insights to adjust your marketing efforts.

Best Practices for Custom URL Parameters
Follow the best practices below to improve how you track your campaigns.
Keep It Consistent
Consistency is key when naming your parameters.
- Set Clear Naming Rules: Decide on a naming style that everyone on your team uses and understands. For example, choose between “utm_campaign” or “campaign” and stick with it every time.
- Use Lowercase Letters: Always write your parameters in lowercase letters. This avoids mix-ups in your data because some systems treat uppercase and lowercase letters differently.
- Avoid Spaces and Special Characters: Don’t use spaces or special symbols in your parameter names. Instead, separate words using underscores (_) or hyphens (-). This makes your URLs cleaner and helps analytics tools read them correctly.
Test Before You Launch
Before starting your campaigns, test all your URLs and tracking setups.
- Check Your URLs: Make sure each URL works and goes to the right page. Ensure that all the parameters are attached properly.
- Use Preview Modes: Tools like Google Tag Manager (GTM) and Google Analytics 4 (GA4) have preview modes. Use them to see how your data will be collected. This helps you catch mistakes before they affect your real data, saving you from future headaches.
Use Helpful Tools
- Try UTM.io: Use platforms like UTM.io to create and manage your UTM parameters easily. It keeps everything organized and makes sure your team uses the correct parameters every time.
- Automate When You Can: Automation reduces mistakes that can happen when entering parameters by hand. It also saves time, so you can focus more on analyzing data than setting it up.
Be Smart with Custom Dimensions
When setting up custom dimensions in GA4, consider how you use them carefully.
- Choose the Right Scope: Decide between event scope (for actions like button clicks) or user scope (for things like customer type) based on the insights you want.
- Know the Limits: GA4 limits how many custom dimensions you can create. Prioritize the ones that will give you the most valuable information for your business goals.
Learn and Improve
Collecting data is just the first step. The real value comes from analyzing it and taking action.
- Review Regularly: Schedule times to look over your analytics. Look for trends, successes, and areas that need improvement.
- Adjust Your Strategies: If you notice a campaign brings lots of visitors but few sales, you might need to change your message or who you’re targeting.
Frequently Asked Questions
What’s the difference between UTM parameters and custom parameters?
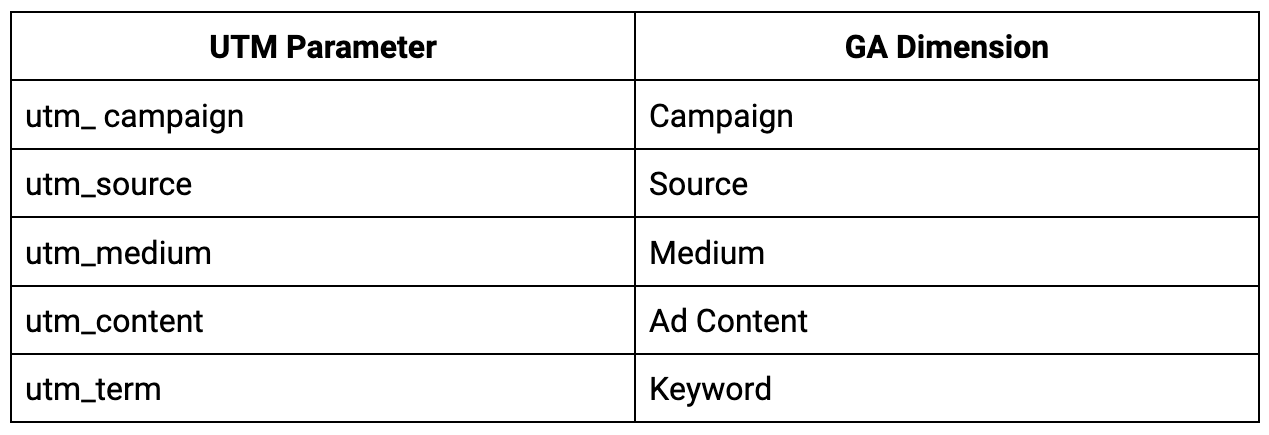
A: UTM parameters are standardized parameters used by Google Analytics to track source, medium, campaign, term, and content.
Custom parameters are additional parameters you define to capture more specific data not covered by standard UTM parameters.
How many custom dimensions can I have in GA4?
A: GA4 allows up to 50 event-scoped custom dimensions and 25 user-scoped custom dimensions per property.
Can I use custom parameters in email marketing campaigns?
A: Yes, custom parameters can be added to links in email campaigns to track specific details like email variants, user segments, or promotions.
Do custom URL parameters affect SEO?
A: Custom URL parameters, like UTMs, are primarily used for tracking marketing campaigns in ads, emails, and social media, not for URLs intended for SEO. URLs with UTMs or other parameters are usually not indexed by search engines, as they are not part of the organic search experience.
However, if parameterized URLs are accidentally exposed and indexed, they can cause issues like duplicate content or diluted link equity.
Is it necessary to use GTM to capture custom parameters?
A: While GTM simplifies the process and offers flexibility, you can also capture custom parameters directly with custom code or other tag management systems.